As recently we have discussed about how to use ‘Custom Permalink’ feature in blogger for On-Page SEO, today I`m gonna tell you about how to apply custom permalink for your old posts and how to redirect that old URL to newly created custom permalink.
Just coming to the topic, I’m showing you an example about the whole process by taking my one of the old posts, how to enable/recover a disabled facebook account.
Earlier I wrote that post and my automatic generated URL for that post was – http://tricks99.net/2013/05/how-to-enable-recover-disabled-facebook.html
So I was not satisfied with that automatic permalink. 🙁 So I’m applying custom permalink for that post.
So let’s step into how to apply custom permalink for old posts,
- Open the post for which you want to make a new URL.
- After opening the post, click ‘Revert to draft’ button on the right top.
- Then click on ‘Links’ under the ‘Post settings’ menu and select ‘Custom Permalink’ and write your keywords. Leave the ‘Title Link’ and ‘Enclosure Link’ as blank and finally click ‘Done
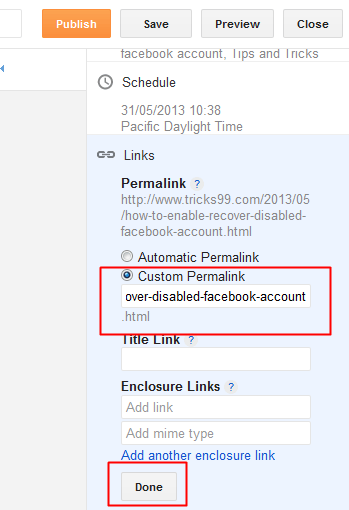
So my new URL which I created for that post is – http://tricks99.net/2013/05/how-to-enable-recover-disabled-facebook-account.html
This step is similar to the process which I have explained in my earlier post.
- Now after completing all the above 3 steps, finally click ‘Publish’ on the top right.
Now redirecting the old URL to newly created custom URL,
Why should you redirect your old URL to new URL?
- Our old URLs were already indexed in search results. As google takes some time to re-index our new URL, by default, google will show our old URL in search results. So if anyone clicks on that old URL, our page will be redirected to a 404 error page.
- We may have already shared that old URL in many facebook pages, groups, messages etc. So if people click those old links, they will be redirected to a 404 error page.
For example, I have shared my old URL in one FB group earlier.

So when anyone clicks on that link, it will display a 404 error page. So I will lose traffic for that post.

So that’s why we have to redirect our old URL to new URL to avoid 404 error, to maintain traffic.
How to redirect old URL to new URL:
- Now click on ‘Settings’ and ‘Search preferences’.
- Under ‘Errors and redirections’, click ‘Edit’ button on ‘Custom redirects’.

- Now click on ‘New Redirect’ and you will see 2 options ‘From:’ and ‘To:’. So in that ‘From’ option, you have to place your old URL. In ‘To’ option, you have to place new URL.

The format in which you should place your both old and new URL’s is /2013/05/how-to-enable-recover-disabled-facebook.html as already it will show www.yourdomain.com when you place mouse in both ‘From:’ and ‘To:’ options.
So when you filled both ‘From:’ and ‘To:’ URL’s, click ‘Permanent’, ‘Save’ and ‘Save changes’ button.
That’s it. So it should be like this below image,

Now you have successfully redirected old URL to new URL. So when anyone clicks your old URL, it will automatically get redirected to new URL which helps you to save traffic without displaying a 404 error page.
Thanks. Now I’m gonna redirect all my old URLs to new URLs which are added with keywords 😀